Add an Impact
Note: When an incident is created, an impact entry is automatically added using information from the Impact Attributes section of the Incident form. See Add an Incident for more information. You can access the Incident List within your risk control matrix or risk event category. See View the Incident list for additional information.
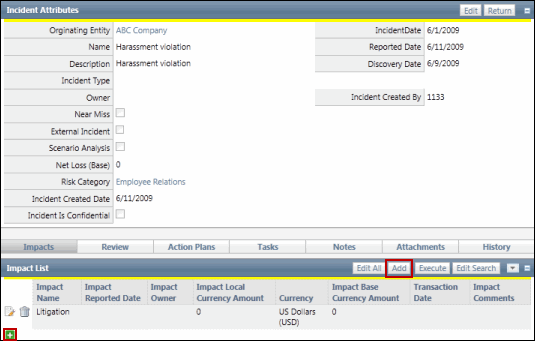
- Access the Incident list.
- Click the incident name where you wish to assess the impact.
- Click the Impacts tab.

- Click
 Add in the Impact List to add impacts through in-line editing or click Add to open the Impact form in a separate window.
Note: See In Line Editing for additional information.
In Line View

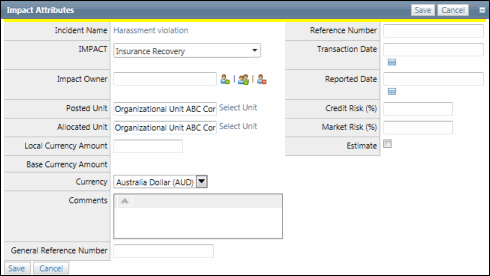
Impact Form

- Impact - Select the type of impact for the incident form the drop-down list.
- Posted Unit - Select the entity where the loss is going to be "posted" from an accounting perspective. By default, this field shows the business entity from which the associated incident was created.
- Allocated Unit - By default, this field shows the name of the business entity in which the associated incident was created, but the reporter (the user entering the impact) may choose to allocate the impact to different or additional entities
- Local Currency Amount - Enter the amount of potential loss in the chosen local currency. This is a required field.
- Currency - Select the local currency from the drop-down menu.
Note: Administrators determine the currency types in the Currency settings. See Currency Settings for additional information.
- Impact Owner - Click
 Select User or
  Select User Group to enter the impact owner. There are three options:
- Enter text that contains the name, email address or network ID of the user you wish to select and click Execute or click Show All.
Note: A list of users containing, (not equaling), the entered text will display in the search results.
- Click the name of the user or click Select No User to indicate the user is not required.
- Enter text that contains the name, email address or network ID of the user you wish to select and click Execute or click Show All.
- GL Account - Enter the General Ledger account number for reference, if necessary.
- Transaction Date - Click
 Calendar and then click a date on the calendar to enter the date the impact occurred. This is a required field.
 - Reported Date - Click
 Calendar and then click a date on the calendar to enter the date the impact was reported. This is a required field.
 - Comments - Enter any comments related to the impact.
- Credit Risk % - Enter a percentage of the impact's loss amount that is associated with a credit risk, if applicable. Credit Risk is the risk of loss due to a debtor's non-payment of a loan or other line of credit.
- Market Risk % - Enter a percentage of the impact's loss amount that is associated with a market risk, if applicable. Market Risk is the risk that a decrease in investment value will occur due to market factors and changes.
- Reference Number - Enter the reference number associated with the impact, if necessary.
- Estimate - Select this check box to indicate this impact is capturing an estimate, if necessary.