|
|
|
|
Create Risk Templates
Add Risks
- Click
 Expand to view the Risks section.
 - Click
 Add in the Risks section to link risks to this process through in-line editing or click Add to open the Risk form in a separate window.
In Line View

Risk Form
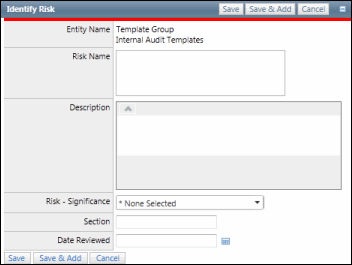
- Enter a Risk Name and description.
Note: Do not utilize the following characters when entering information into Portal; & * % # @ ; / \ : , - or ~. .
- Select a Significance from the drop-down list.
- Select a Date Reviewed.
Note: This field is only applicable if ORM-RCSA has been licensed.
- Click Save.
Notes:
- Risk Names are required to be unique.
- The Risks are added to the Risk List.
- Once the risk as been submitted, the Risk Evaluation section can be completed.
- Administrators can configure fields in the Risk form to update a field based on a specific value of another field or fields. See Configure a Calculated Field for details.
Link Objectives to Risks
Existing objectives contained within the template can be linked to a given risk.
- Click the risk name in the risk list.
- Click Link in the Objectives section.
- Select the objective name check box next to the objectives affected by this risk.

- Click Save to link the objectives to the risk.
Note: This will enable users to create relationships between a given risk and one or more objectives. The related risks will be displayed on the Objective Template Form.
Add new objectives to risks
- Click the risk name in the risk list.
- Click Add in the Objectives section.
Note: You can also click
Add to add new objectives in-line. See In Line Editing for additional information.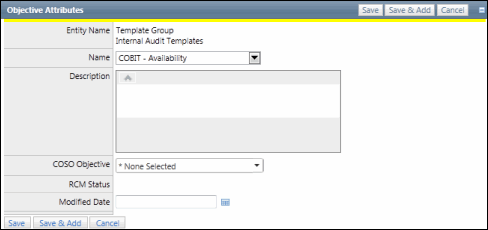
- Select an objective from the drop-down list.
- Enter a description.
- Select a COSO objective from the drop-down list.
- Click Save.
Link controls to risks
- Click the risk name in the risk list.
- Click Link in the Controls section.
- Select the control name check box next to the controls that mitigate this risk.

- Click Save to link the controls to the risk.
Note: This will enable users to create relationships between a given risk and one or more controls. The related risks will be displayed on the Control Template Form.
Add new controls to risks
- Click the risk name in the risk list.
- Click Add in the Controls section.
Note: You can also click
Add to add new controls in-line. See In Line Editing for additional information.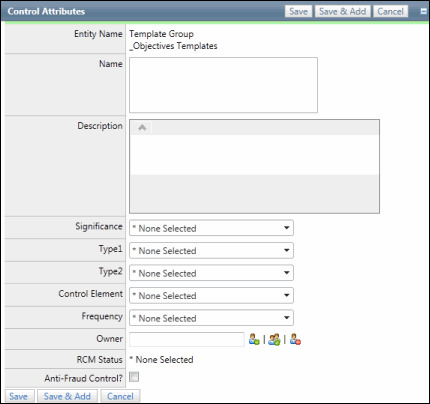
- Enter the Control Name and Description..
- Select Control Type1, Control Type2, Significance, COSO Element, and Control Frequency from the drop-down lists.
- Click
 Select Useror
  Select User Group to choose an owner for this control.
- Enter text that contains the name, email address or network ID of the user you wish to select and click Execute or click Show All.
Note: A list of users containing, (not equaling), the entered text will display in the search results.
- Click the name of the user or click Select No User to indicate the user is not required.
- Enter text that contains the name, email address or network ID of the user you wish to select and click Execute or click Show All.
- Click
 Save or Save to accept changes and return to the Risk Template form.
Note: New controls will automatically be linked to risks from which they've been added.