|
|
|
|
Create a Search
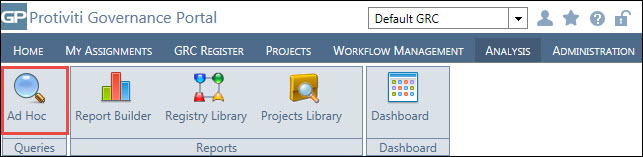
- Access the
 Search Interface.
- Select the Default GRC context from the context menu.
- Click the Analysis tab.
- Select Ad Hoc from the Queries group.
- Right-click the folder or sub folder in which you want to create a search and select
 New Search.
 Note: You can add a folder only at the node level and create a search only at the folder level.

- Type a name for the search in the Name text box.
Note: Each search is assigned a name by default. You can modify it by entering a new name for it in the Name text box.
- Click the Select the location drop-down menu to change the location of the search, if necessary.
- Select a view definition from the View Definition drop-down list.
Note: For more information on view definitions, see the Manage View Definitions topic.
- Select Objects, Editable/Non-Editable Fields, and Fields Type from the drop-down under Filter Columns section. As per your selection in Editable/Non-Editable Fields drop-down, the fields will get displayed as Italicized in the Selected Columns to Display window and only filtered results will be displayed in Available Columns to Display window.
- Customize and streamline your search with the following tabs.
Note: The Selected Columns to Display list in the Fields tab cannot be left blank. Updating information in rest of the tabs is optional.
 Fields
 The Fields tab allows you to select the columns that will be displayed in the search results. You can filter the list of available columns by object and field type.
- Filter Columns: Select a field and object from the Object drop-down list in the Filter Available Columns section.
Note: Select All Objects or All Field Types to select all of the available objects/fields in the drop-down lists.
- Add columns to the search by highlighting a column name in the Available Columns to Display list and clicking the
 Move Right button. The selection will be moved to the Selected Columns to Display window. Conversely, remove columns from the search by highlighting a column name in the Selected Columns to Display list and clicking the
  Move Left button. The selection will be moved to the Available Columns to Display window.
 Note: Hold down the Ctrl or Shift key when selecting multiple columns.
- Click the
 Move All Right button to move all of the columns from the Available Columns to Display list to the Selected Columns to Display list, or click the
  Move All Left button to move all of the columns from the Selected Columns to Display list to the Available Columns to Display list.
 - Highlight a column name and use the
 Move Up or
  Move Down buttons in the Selected Columns to Display list.
- Filter Columns: Select a field and object from the Object drop-down list in the Filter Available Columns section.
 Filter
Use the Filter tab to narrow the result set of the search you are creating.
Once the fields (columns) have been defined as part of a search, these fields can be filtered to return only the criteria that you specify. Each filter must include an And/Or selection and requires the user to complete the next three fields with a field name, query condition, and a value.

- Select And or Or from the drop-down list.
- Select the object you wish to use in defining your filter.
Note: See Create a View Definition for more information on how to set a default object type.
- Select the field you wish to use in defining your filter.
- Select a condition from the drop-down list.
Note: View the link to the condition types below for more information on condition types.
- Enter a value in the last text box. In case of a boolean field, True or False will display.
Note: Highlight a parameter and select ( ) to enclose it in parentheses, and -( )- to remove them.
- Click Add Filter.
- Highlight a parameter and use the Move Up or Move Down arrows to move a parameter up or down in a list, and select Delete to remove the parameter from the list.
The following are a list of conditions, descriptions and values through which you can filter your data:
Condition
Description
Values
Equals
Allows for user to enter a single exact value to be found and returned
Input a single value, number or text
Not Equals
Allows for user to enter a single exact value, that should not be returned
Input a single value, number or text
Contains
Number or text (exact or partial) that is found within that field
Number or text
Not Contains
Number or text (exact or partial) that is not found within that field
Number or text
Greater than
Value that all returns must be higher than
Number or text
Less than
Value that all returns must be less than
Number or text
Greater than or equal to
Value that all returns must be equivalent to or higher than
Number or text
Less than or equal to
Value that all returns must be equivalent to or less than
Number or text
Between
Brings up two fields with an “and” statement between
Number or text
In
Brings up a pick list with the values found in that particular field. Records with this value found will be returned
Multi-selections are possible.
Not in
Inverse of the “not in” parameter, meaning that selections with these records will not be in the return list.
Multi-selections are possible.
Begins with
Records where the value begins with a particular text entry will be returned.
Number or text
Ends with
Records where the value ends with a particular text entry will be returned.
Number or text
Is Null
Records where the value is null for a particular field will be returned (e.g. show me risks where the control name is null would show you risks that do not have controls linked to them).
Number or text
Is Not Null
Records where the value is not null for a particular field will be returned (e.g. show me risks where the control name is not null would show you risks that have controls linked to them).
Number or text
@me
Records the name of the logged in user when a search is executed. It would apply only for the Name fields.
Text
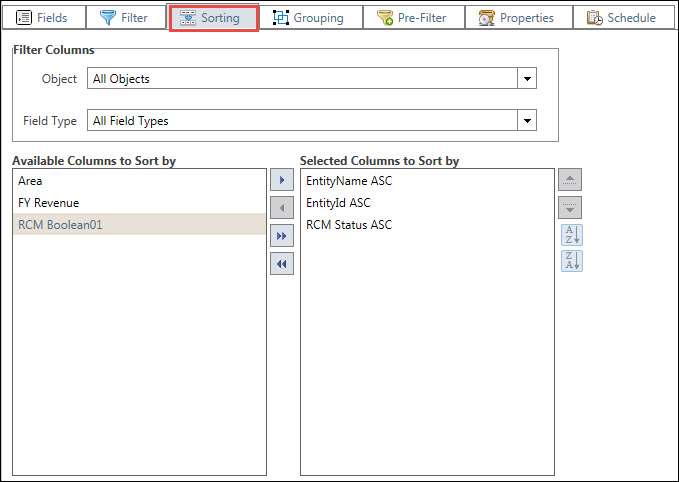
 Sorting
The Sorting tab allows you to sort the search results.
- Filter Columns: Select a field and object from the Object drop-down list in the Filter Available Columns section.
Note: Select All Objects or All Field Types to select all of the available objects/fields in the drop-down lists.
- Add columns to the search by highlighting a column name in the Available Columns to Sort By list and clicking the Move Right. The selection will be moved to the Selected Columns to Sort By window. Conversely, remove columns from the search by highlighting a column name in the Selected Columns to Sort By list and clicking the Move Left. The selection will be moved to the Available Columns to Sort By window.
Note: Hold down the Ctrl or Shift key when selecting multiple columns.
- Click Move All Right to move all of the columns from the Available Columns to Sort By list to the Selected Columns to Sort By list, or click Move All Left to move all of the columns from the Selected Columns list to the Available Columns list.
- Highlight a column name and use the Move Up or Move Down arrows in the Selected Columns to Sort By list.
- Highlight a column and click to sort alphabetically, or click to sort in a reverse alphabetical order in the Selected Column to Sort list.
- Filter Columns: Select a field and object from the Object drop-down list in the Filter Available Columns section.
 Grouping
 The Grouping tab allows you to specify which columns to use for grouping the search results. When you group, the search results are divided into groups by the values specified in the Selected Columns to Group By section.
Note: Multiple column groupings are permitted. However, Grouping does not work when the search results extend to more than one page or the search is editable. It works when Pagination is disabled and the View Definition "Is Search Editable" is false. See
The Properties Tab and The Editable Objects Tab (View Definition) topics for more information.The Properties tab allows you to customize the display of search results. You can also view the basic information about a search, such as Created By, Created Date, Modified By, and Modified Date.
Page Settings
- Default Page Size: Enter the number of records displayed on a page. If the Paginate List check box is selected, then the list will display on multiple pages as necessary when the number of records exceeds the default page size.
- Max Records: Enter the maximum number of records that the search will display. You will now see a Data Truncate notification message in Search and Analysis window, if the number of search results on a page equals or exceeds the maximum number of records to be displayed.
- Frozen Columns Count: Enter a number from 1 to 4 to freeze columns headers of columns starting from left. For instance, typing 3 in the text box will freeze column headers for first 3 columns of a search. It is assumed that maximum 4 columns can be viewed comfortably on a screen, without having to scroll to the right of the screen. Therefore, you can enter numbers from 1 to 4 in the Frozen Columns Count text box. Entering a number greater than 4 will freeze the column headers of first 4 columns of the search
- Page Settings:
- Paginate List: This check box is selected by default to limit the number of records in the search to 3000 per page. If there are over 3000 records, the remaining records will be shifted to another page in search results.
- Distinct: Select this check box to avoid displaying duplicate records in the search results.
- Split Pane: Select this check box to use the Split Pane feature for viewing the search results. When you click on an object in the content pane, the screen will split into two sections. The details of that object will display in the bottom section while the original object will display in the top section.
- Description: Enter a search description.
Download Settings
Note: This section is only available when you edit an existing search. For more information, see Edit Search Criteria
- Remove Rich Text Formatting in Excel Download: Select this check box if you do not wish to apply the rich text formatting to the search results in the Excel file.
- Remove Auto Fit Row in Excel Download: Select this check box if you do not want the system to adjust the width of the cells of the Excel sheet in conjunction with the number of characters in the cells. Selecting this option will keep the default width of the cells in the Excel sheet irrespective of the number of characters in a cell.
Search Results/Pivot Settings
- Enable Pivot: Select this check box to apply Pivot in your search result.
- Enable Grid Lines: Select this check box to apply grids in the pivot chart.
- X-Axis Label Angle: Select this check box to position the legends of a chart in a particular angle, for example 45 degrees.
- View Results In:
- View Results in List Form: Select this radio button to view the result in list form.
- Excel Report: Select this radio button if you wish to open or download the search results in an Excel workbook outside the Governance Portal.
- Pivot: Select this radio button along with one of the options from the drop-down to view a result in graph format (Column, Bar or Pie).
- Associate Excel File: Click Browse to locate the Excel Workbook that contains the Report/Graphic information from your desktop.
- Remove Current Association: Select this check box to remove the uploaded Excel file if one was previously uploaded.
Note: This option displays only if the search already has an associated Excel file.

Note: See Utilize Excel to Create Reports from Search Results for more information on managing Excel reports form the Search Interface.
- Filter Columns: Select a field and object from the Object drop-down list in the Filter Available Columns section.
Note: Select All Objects or All Field Types to select all of the available objects/fields in the drop-down lists.
- Add columns to the search by highlighting a column name in the Available Columns to Group By list and clicking the Move Right button. The selection will be moved to the Selected Columns to Group By window. Conversely, remove columns from the search by highlighting a column name in the Selected Columns to Group By list and clicking the Move Left button. The selection will be moved to the Available Columns to Group By window.
Note: Hold down the Ctrl or Shift key when selecting multiple columns.
- Click the Move All Right button to move all of the columns from the Available Columns to Group By list to the Selected Columns to Group By list, or click the Move All Left button to move all of the columns from the Selected Columns to Group By list to the Available Columns to Group By list.
- Highlight a column name and use the Move Up button or Move Down arrows in the Selected Columns to Group By list.
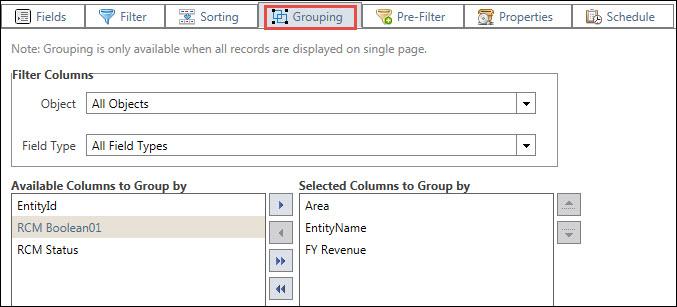
Note: Grouping can also be done by dragging a column name and dropping it in the specified location, at the at the top of the search.
 Pre-Filter
 Properties
 The Properties tab allows you to customize the display of search results. You can also view the basic information about a search, such as Created By, Created Date, Modified By, and Modified Date.
Page Settings
- Default Page Size: Enter the number of records displayed on a page. If the Paginate List check box is selected, then the list will display on multiple pages as necessary when the number of records exceeds the default page size.
- Max Records: Enter the maximum number of records that the search will display. You will now see a Data Truncate notification message in Search and Analysis window, if the number of search results on a page equals or exceeds the maximum number of records to be displayed.
- Frozen Columns Count: Enter a number from 1 to 4 to freeze columns headers of columns starting from left. For instance, typing 3 in the text box will freeze column headers for first 3 columns of a search. It is assumed that maximum 4 columns can be viewed comfortably on a screen, without having to scroll to the right of the screen. Therefore, you can enter numbers from 1 to 4 in the Frozen Columns Count text box. Entering a number greater than 4 will freeze the column headers of first 4 columns of the search
- Page Settings:
- Paginate List: This check box is selected by default to limit the number of records in the search to 3000 per page. If there are over 3000 records, the remaining records will be shifted to another page in search results.
- Distinct: Select this check box to avoid displaying duplicate records in the search results.
- Split Pane: Select this check box to use the Split Pane feature for viewing the search results. When you click on an object in the content pane, the screen will split into two sections. The details of that object will display in the bottom section while the original object will display in the top section.
- Description: Enter a search description.
Download Settings
Note: This section is only available when you edit an existing search. For more information, see Edit Search Criteria
- Remove Rich Text Formatting in Excel Download: Select this check box if you do not wish to apply the rich text formatting to the search results in the Excel file.
- Remove Auto Fit Row in Excel Download: Select this check box if you do not want the system to adjust the width of the cells of the Excel sheet in conjunction with the number of characters in the cells. Selecting this option will keep the default width of the cells in the Excel sheet irrespective of the number of characters in a cell.
Search Results/Pivot Settings
- Enable Pivot: Select this check box to apply Pivot in your search result.
- Enable Grid Lines: Select this check box to apply grids in the pivot chart.
- X-Axis Label Angle: Select this check box to position the legends of a chart in a particular angle, for example 45 degrees.
- View Results In:
- View Results in List Form: Select this radio button to view the result in list form.
- Excel Report: Select this radio button if you wish to open or download the search results in an Excel workbook outside the Governance Portal.
- Pivot: Select this radio button along with one of the options from the drop-down to view a result in graph format (Column, Bar or Pie).
- Associate Excel File: Click Browse to locate the Excel Workbook that contains the Report/Graphic information from your desktop.
- Remove Current Association: Select this check box to remove the uploaded Excel file if one was previously uploaded.
Note: This option displays only if the search already has an associated Excel file.
Note: See Utilize Excel to Create Reports from Search Results for more information on managing Excel reports form the Search Interface.
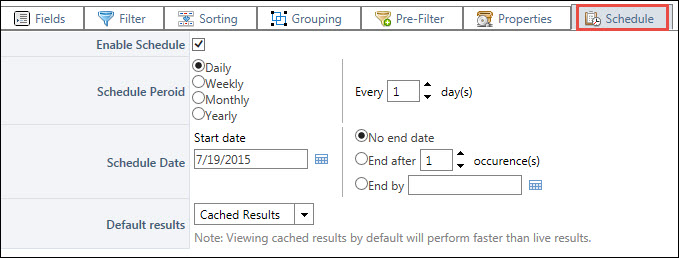
 Schedule
 Note: The Schedule tab will be visible only if the administrator has configured the system to schedule searches. For more information, see Configure Scheduling and Caching for Searches and Reports.
The Schedule tab enables you to schedule searches on a periodic basis and store the results so they can be viewed after the search has been executed.
- Select the Enable Schedule check box to activate the scheduling capability.
Note: You will have to run the search manually when the Enable Schedule check box is de-selected.
- Specify the frequency for the Search schedule by selecting one of the following radio buttons:
- Daily
- Weekly
- Monthly
- Yearly
- Type a number in the adjacent text box to specify the frequency of occurrence. For example, if you selected the Weekly radio button in Step 2 and type 1 in this text box, the Search will run once a week.
- Type a date in the Start date field. or click
 Calendar to select a month, date, and year.
Note: The date should be in the MM/DD/YYYY format.
- Select the appropriate radio button to determine how and when you would like to stop running the search:
- No end date: The search will run continually with no end date.
- End after...occurrence(s): The search will end after a set number of occurrences. Specify the number of occurrences in the field below.
- End By: The search will end on a selected date. Type a date in the field or click Calendar to select a month, date, and year.
- Default result: Select from the drop-down menu how the search will be displayed when it is accessed from a favorite or double-clicked from the search interface. You can choose whether the search will display live data or the cached results from the last time the search was executed.
- Live Results: Displays live search results per the recent changes you made to the search criteria. The search results display per the recent changes you made to the search criteria.
- Cached Results: Displays results from the cache of the search the last time it was executed. It may not include the recent changes.
Note: Viewing cached results by default will perform faster than live results.
Pivot
- Select the Enable Schedule check box to activate the scheduling capability.
Pivot is the graphical representation of the search result, allowing you to create interactive pivot grids and charts that provide simplified dashboard capabilities.
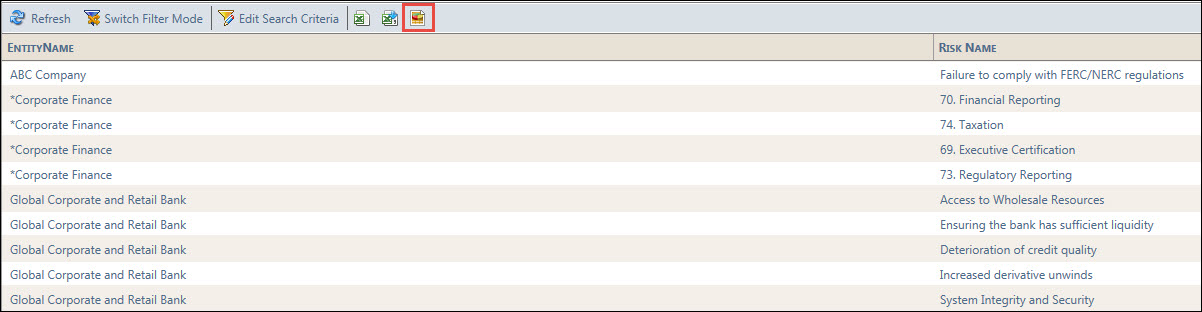
- Click the Pivot
 icon on your List Form Search Result screen.
Note: This icon will appear if Pivot has been enabled. To enable, go to the Properties Tab, within the Edit Search Criteria screen, and select Enable Pivot under Search Result/ Pivot Settings.
Note: Search results can be displayed by default, when executing the saved search, in list form or pivot. To display them in pivot, select Pivot for the View Results In field, from the Properties Tab under Search Result/ Pivot Settings.
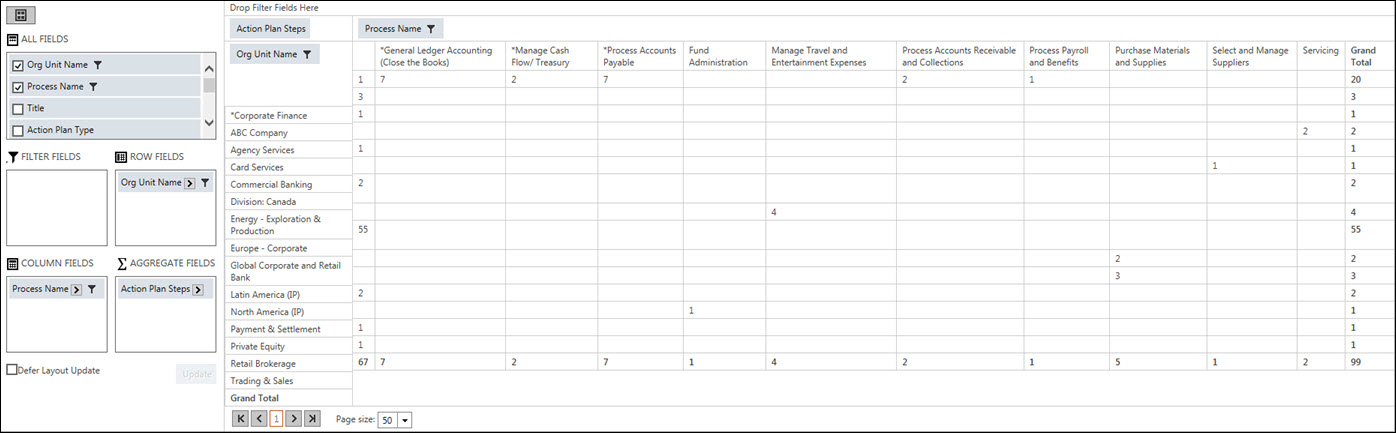
When the Pivot screen appears, following actions can be performed in this page:
- Select Row, Column, Aggregate and Filter fields from All Fields list to include those fields in to the Pivot table.
Note: You can also drag and drop fields from Column List into pivot table.
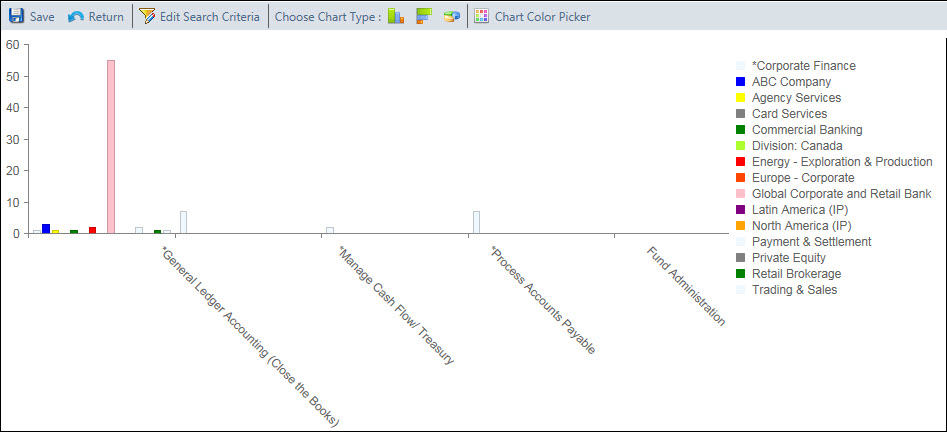
- Save: Click
 Save button to save the Pivot table.
 - Return: Click
 Return button to go back to the List Form search result.
 - Edit Search Criteria: Click
 Edit Search Criteria button to edit the search fields. Pivot Settings are also available here.
Note: See
The Properties Tab under Create Search - Ad hoc Search for more details related to Pivot Settings.The Properties tab allows you to customize the display of search results. You can also view the basic information about a search, such as Created By, Created Date, Modified By, and Modified Date.
Page Settings
- Default Page Size: Enter the number of records displayed on a page. If the Paginate List check box is selected, then the list will display on multiple pages as necessary when the number of records exceeds the default page size.
- Max Records: Enter the maximum number of records that the search will display. You will now see a Data Truncate notification message in Search and Analysis window, if the number of search results on a page equals or exceeds the maximum number of records to be displayed.
- Frozen Columns Count: Enter a number from 1 to 4 to freeze columns headers of columns starting from left. For instance, typing 3 in the text box will freeze column headers for first 3 columns of a search. It is assumed that maximum 4 columns can be viewed comfortably on a screen, without having to scroll to the right of the screen. Therefore, you can enter numbers from 1 to 4 in the Frozen Columns Count text box. Entering a number greater than 4 will freeze the column headers of first 4 columns of the search
- Page Settings:
- Paginate List: This check box is selected by default to limit the number of records in the search to 3000 per page. If there are over 3000 records, the remaining records will be shifted to another page in search results.
- Distinct: Select this check box to avoid displaying duplicate records in the search results.
- Split Pane: Select this check box to use the Split Pane feature for viewing the search results. When you click on an object in the content pane, the screen will split into two sections. The details of that object will display in the bottom section while the original object will display in the top section.
- Description: Enter a search description.
Download Settings
Note: This section is only available when you edit an existing search. For more information, see Edit Search Criteria
- Remove Rich Text Formatting in Excel Download: Select this check box if you do not wish to apply the rich text formatting to the search results in the Excel file.
- Remove Auto Fit Row in Excel Download: Select this check box if you do not want the system to adjust the width of the cells of the Excel sheet in conjunction with the number of characters in the cells. Selecting this option will keep the default width of the cells in the Excel sheet irrespective of the number of characters in a cell.
Search Results/Pivot Settings
- Enable Pivot: Select this check box to apply Pivot in your search result.
- Enable Grid Lines: Select this check box to apply grids in the pivot chart.
- X-Axis Label Angle: Select this check box to position the legends of a chart in a particular angle, for example 45 degrees.
- View Results In:
- View Results in List Form: Select this radio button to view the result in list form.
- Excel Report: Select this radio button if you wish to open or download the search results in an Excel workbook outside the Governance Portal.
- Pivot: Select this radio button along with one of the options from the drop-down to view a result in graph format (Column, Bar or Pie).
- Associate Excel File: Click Browse to locate the Excel Workbook that contains the Report/Graphic information from your desktop.
- Remove Current Association: Select this check box to remove the uploaded Excel file if one was previously uploaded.
Note: This option displays only if the search already has an associated Excel file.
Note: See Utilize Excel to Create Reports from Search Results for more information on managing Excel reports form the Search Interface.
- Choose Chart Type: Click
 for Column Chart,
  for Bar Chart and
  for Pie Chart to view the pivot table in respective chart format.
 - Chart Color Picker: Click
 to change or modify colors of the chart legends.
Note: By default, the chart has only 11 unique colors, after that user needs to choose from the Chart Color Picker.
- Change Layout: Click
 to change the layout of the Pivot table Filed List. You can change the layout to Stacked, Side-By-Side, Two-By-Two, and One-By-Four.
- Change Layout: Click
- When finished, click Save to save your changes,
 Save And Execute to save the changes and execute the search at one go,
  Run to execute the search without saving, and
  Cancel to cancel without saving.
|
See Also |