|
|
|
|
Project Scheduler Overview
The Project Scheduler allows team members and project managers to track and schedule projects based on resource availability. From the Project Scheduler, managers can add and edit projects, manage project dates, hours, expenses and status, establish planned hours for the project, check team member availability, assign team members and allocate plan hours.
 Access the Project Scheduler
The scheduler shows a calendar view of all projects and team members in the system. By default, the scheduler displays 31 days into the future and can be scrolled forward or backward in monthly or weekly increments. The Project Scheduler provides two views:
- Project View: This view shows you the list of projects. You can view the list of team members assigned to a specific project by clicking the Show Assigned Team Member icon against the project name. You can filter the projects on the basis of Project Start Date, Project End Date, and Project Status in the Project View. Next to each project name are the assigned hours vs. planned hours for the project The color of the project shows the level of hours assigned, as shown below:
 Not Assigned: No planned hours have been assigned to team members.
 Fully Assigned: All planned hours have been assigned to the team members.
 Over Assigned: Assigned hours exceed the scheduled hours.
 Under Assigned: Assigned hours are below the scheduled hours.
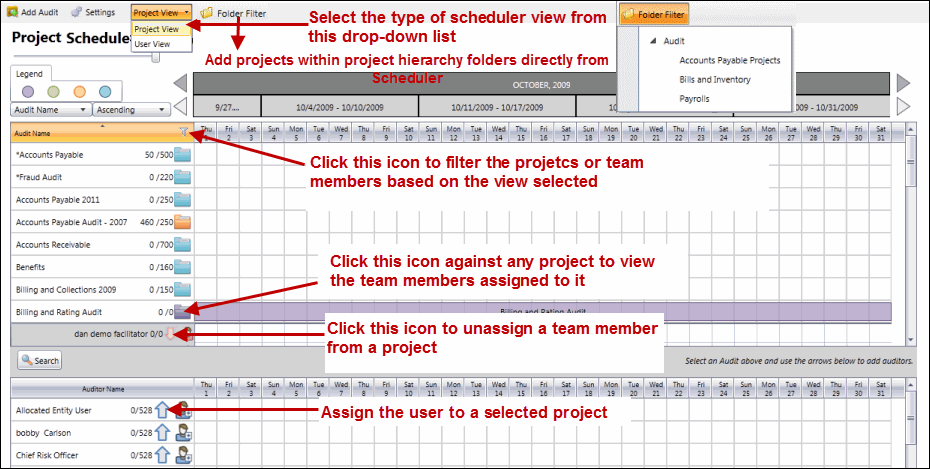
Note: See Assign Team Members and Plan Hours in the Project Scheduler for more information on assigning team members and scheduling hours via the Project Scheduler.
- User View: The User View shows you the list of team members. You can view the list of projects assigned to each team member by expanding the team member name by clicking the Show Project Assignment icon. If you are in the User View, you can filter the team members on the basis of name and row content. Hover the mouse cursor over the project name under a specific team member name to view the project's start date, end date, planned hours, and assigned hours.
Note: You can filter the projects and team members on the basis of various criteria. The filter option is available in both views.
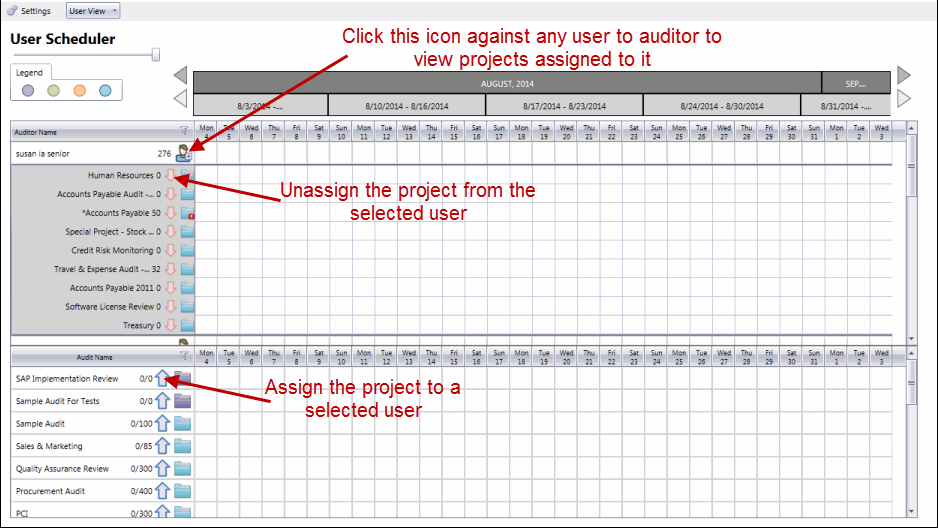
Note: See Assign Projects and Plan Hours in the User View for more information on assigning projects and scheduling hours via the User View.
Basic Navigation
- Change Dates: Use the arrow buttons at the top of the screen to change the week or the month in the view.
- Sort Projects: Click on the drop-down menu in the upper left-hand side of the screen to sort the projects in ascending or descending order by Project Name, Start Date, End Date, or Planned Hours.
- Filter: Click
 Filter next to the project name column header to filter the projects by Start Date, End Date, and/or Project Status. You can choose multiple statuses at once.
Navigation Icons
The following icons will help you identify various operation on the Scheduler window:
User View Icons
 - Assigned Team Member
 - Assigned Team Member with Conflict
 - Assigned Team Member Expanded
 - Assigned Team Member Expanded with Conflict
 - Assigned Team Member Collapsed
 - Assigned Team Member Collapsed with Conflict
 - Unassigned Team Member Expanded
 - Unassigned Team Member Collapsed
 - Unassigned Team Member Expanded with Conflict
 - Unassigned Team Member Collapsed with Conflict
Project View Icons
 - Completely assigned Project
 - Unassigned Project
 - Partially Assigned Project
 - Over Assigned Project
 - Unassigned Project with Conflict
 - Partially Assigned Project with Conflict
 - Completely assigned Project with Conflict
 - Over Assigned Project with Conflict
 - Assign Team Member
 - Unassign Team Member
 - Non Project Event
 - Non Project Event with Conflict