|
|
|
|
Configure a Form
Forms are used to capture data within the Governance Portal. They are comprised of fields that capture specific data points for the organization. By default, each form is shipped with a standard set of fields. Form configuration allows the administrator to specify field names, field behavior (visible, required etc.) and field layout (height, width etc.), and field security on most forms (e.g. RCM attributes, objectives, tests, indicators, searches, reviews etc.) within the Governance Portal. See Configure Field Settings for the characteristics that can be configured for each field type.
- Access the appropriate configuration form:
- Click the form name to be configured (e.g. contextual information, Audit Template).
Note: The form displays the standard and/or previously defined fields in the row and column order in which they are displayed on the form (e.g. row 1, column 1). Row numbers are listed down the left-hand side and column numbers are listed across the top of the form.
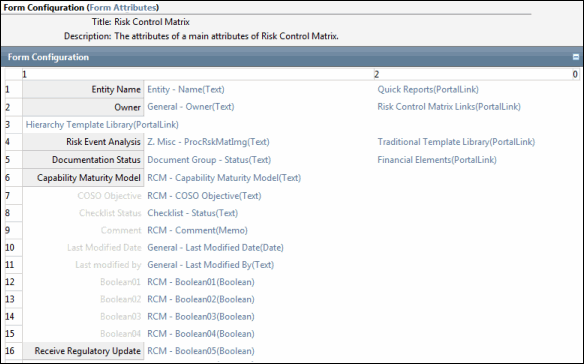
- Click the link of the field you wish to configure. This may be an existing field or one that has not yet been configured or defined.
Notes:
- Fields that are not displayed are grayed out.
- Click the Quick Reports(PortalLink) link to display links to Quick Reports in a Risk Event Category, RCM, Risk, Objective, Incident or Impact form. See Quick Reports for more information.
- Click Expand, if necessary.
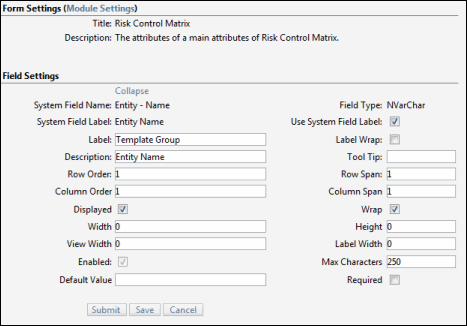
- Complete the configuration field settings. The configuration options available are based on the field data type (e.g. text, number etc.) selected. See Appendix - Configure Field Settings for a description of each setting option.
Note: There are some system fields that cannot be configured. Only the default fields in the form and fields designated for configuration (i.e. fields that begin with cat, memo, decimal, etc.) can be configured.
- Click Submit.
Note: This validates the information within the database but does not change the list.
- Click Save.
Note: This publishes the changes/updates the list.
- Click OK in the warning box.
 Organization/Process Configuration Forms