|
|
|
|
Creating an Email Template
 Access the Email Templates page.
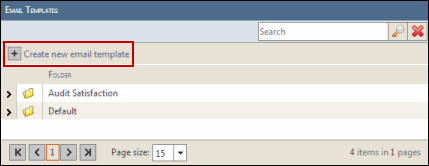
- Click the
 Create new email template icon.
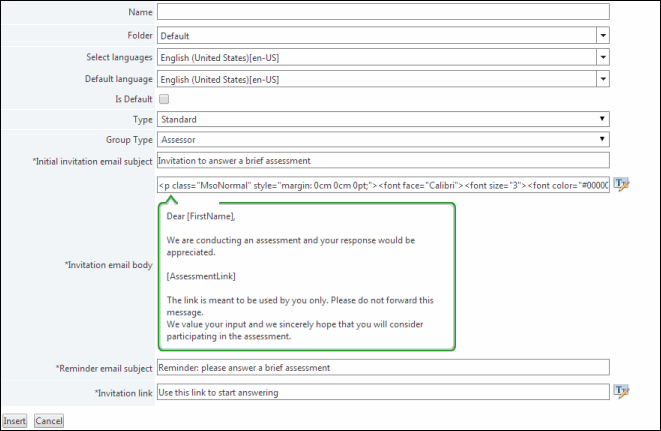
- Name: Type the desired name of the email template.
- Folder: Select the assessment folder in which you wish to house the email template. See Manage Assessment Folders for more information.
- Select languages: You can create the email template in multiple languages. Select the desired languages from the drop-down list. Based on the number of languages selected, the text boxes are displayed.
- Default language: Define any one of the selected languages as default.
- Is Default: Select this checkbox if you wish to set this email template as default. Note that this email template will replace the existing email template as default, if it matches the Type-Group Type relationship of the existing email template. For instance, if you create the email template using Standard and Assessor as Type and Group Type, respectively, then it will replace the Assessor Email Template (Standard) as default. Out of the two email templates that share same Type-Group-type relationship, only one can be default. The non-default email template can be deleted from the system. The Delete option for the default template will be disabled. See Deleting an Email Template for more information.
Note: You will be prompted with a warning message if you select the Is Default checkbox.
- Type: Select the type of assessment.
- Group Type: Select the type of group.
- Initial invitation email subject: Type the subject of the email.
- Invitation email body: Click the
 icon to compose the email. You can use various formatting options to format the email. The default email content is pre-composed. You can modify the content accordingly. Please note that you will have to compose the content for all languages that you have selected in the Select languages drop-down list. You can also insert tokens in the email from the Insert email token drop-down list. The drop-down list have pre-configured tokens that you can insert in your email. Click OK once you are finished composing the email.
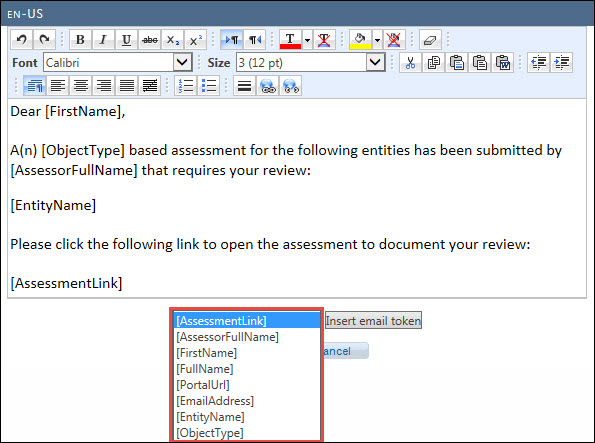
Note: Hover the mouse cursor over the Invitation email body field to preview the email body.
- Reminder email subject: Type the subject for the reminder email.
- Invitation link: Click the icon to type the invitation link. Click Insert when finished.
Note: Custom text for the Invitation link field is optional. Any text entered here will be used to populate the [AssessmentLink] token within the Invitation email subject above. If Invitation link field is blank, the assessment name is used to populate the [AssessmentLink] token.
