|
|
|
|
Configure Object Types
The Object Type configuration screen allows you to determine what entities and other RCM objects will be labeled and displayed in your entity hierarchy.
Note: Once the top-level folders have been named, you can configure the fields in the form for the custom entities to specify field names, behavior, layout and security specific to the GRC domain the entity represents. For more information, see Configure a Form.
 Access the Object Type configuration screen
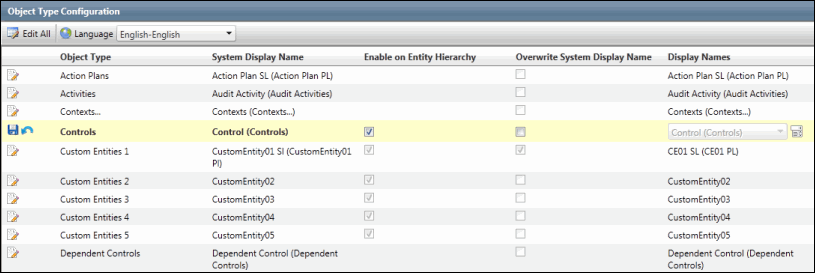
- Select the language from the drop down menu for which you wish to update the objects in the Entity Hierarchy.
Note: The Governance Portal supports multiple languages. For more information, see Using Multiple Languages in the Governance Portal
- Click
 Edit next to the RCM Object you wish to update.
Note: Click
 Edit All to edit all objects in the list at once.
 - Enable/Disable Objects: By default the Enabled on Entity Hierarchy check box is selected for all the objects which appear in the Entity Hierarchy. De-select the checkbox next to the object to remove it from the entity hierarchy view. If you disable an entity (organizational unit, process, project and event, IT application, or project and event), none of the selected entities or their related objects will appear in the hierarchy. Likewise, if you disable a specific object within an entity (RCM, risk, control, objective, test), none of the objects will appear anywhere across entities in the hierarchy.
Note: Disabling objects only affects their visibility in the entity hierarchy. They are still in the system, available on the various forms and can be viewed through searches and reports. If an object type is not visible in Entity Hierarchy, the Enabled in Entity Hierarchy check box for that object type will be disabled.
- System Field Rename: To change the name of the object as it appears in the hierarchy, select the Overwrite System Display Name checkbox and choose the display names from the drop-down list under the Display Names column. Please note that this functionality can be used only via the Default GRC context or any other custom context. The changes made to the object names in a particular context will be visible only across that specific context. Also, the Overwrite System Display Name column will be visible in all the contexts other than the System context.
Note: If singular and plural names of an object type are similar, only one name will be visible under the Display Names column. However, in case of different singular and plural names, the plural name will appear in parenthesis along with the singular name.
- Manage Labels: To update the list of display names, click
 Manage Labels next to the display name field for the object. You cannot edit or delete the default system field label. To add a new name to the list, click
  Add new label, fill out the required fields and click Submit. You can choose to select the Propagate field labels to other languages checkbox. If selected, the labels will be applied to all languages specific to the object type. If a translation exists for a particular language, the label will appear in the translated language, else, the default language will be used. If, however, the Propagate field labels to other languages checkbox is not selected, the label will be used for the current selected language while all other languages will use there default labels.
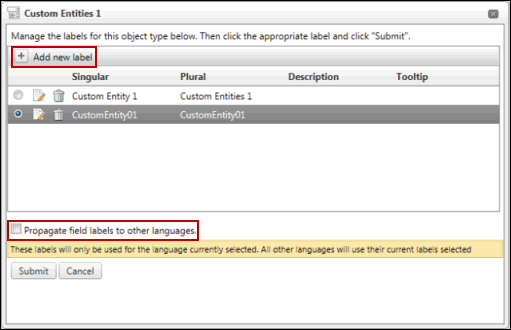
- You can also select the field name from the list in this window. Click Submit when finished.
Note: Renaming system fields from the Object Configuration screen only affects how they are displayed in the entity hierarchy. The original name will still be used on the various forms and through searches and reports.
- Click
 Save. All updates will be reflected in the Entity Hierarchy Tree.

Note: See Entity Hierarchy Tree for details on how to view and use the entity hierarchy.