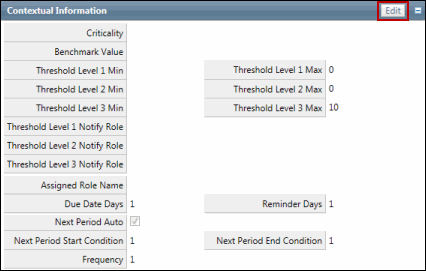
Edit Indicator Contextual Information
- Access the Indicator Definition list.
- Click the indicator reference next to the name of the indicator.
Note: Users may also access the contextual information immediately after saving the indicator definition by scrolling to the bottom of the screen.
- Scroll to the Contextual Information section.

- Click Edit.
Notes:
- Any default values established during the configuration process are displayed.
- Users in the admin role can click
 Configure to change any default field names, values or layout.
- Enter the contextual information for the select indicator.
Note: Remember this is "default" information and may be changed once the indicator is linked to a measurement point (risk, control etc.) within an organization or process.
Field
Description
Criticality
Select an option from the drop-down list to indicate the criticality of the indicator
Effectiveness
Effectiveness of the indicator
Threshold Level Min Value (1, 2, 3)
Input up to 3 minimum threshold level values for the indicator.
Note: Based on the indicator, may not include a minimum threshold value.
Threshold Level Max Value (1, 2, 3)
Input up to 3 maximum threshold level values for the indicator. The specified threshold maximum value must be greater than or equal to the corresponding minimum value (e.g. threshold 1 maximum value must be greater than or equal to the threshold 1 minimum value).
Note: Based on the indicator, may not include a maximum threshold value.
Threshold Level Notify Role (1, 2, 3)
The role to be notified if the corresponding threshold is exceeded (below the minimum threshold value or above the maximum threshold value). The user assigned to this role at the organization, process, or entity (i.e. assigned through the admin tab) level will be notified of the exception.
Assigned Role
Select a role from the drop-down list to determine who will be notified if the measurement related to the indicator is due or past due. The user assigned to this role at the organization, process, or entity (i.e. assigned through the admin tab) level is responsible for providing measurements on a periodic basis. In addition, assigned indicators will appear in the Action Items list.
Due Date Conditions (Days) *
Enter a number to calculate when the measurement is due after the end of the period.
Reminder Conditions (Days) *
Enter a number to calculate the number of days after the due date that a past due notification will be sent.
Auto-create Next Period Conditions *
Place a check in this box to automatically create the next period for the indicator to be measured. This is created when the previous period measurement is locked.
Measurement Frequency
Input a number to indicate how often the indicator will be measured.
Next Period Start Conditions (Months)
Input a number to indicate the number of months for the start date to be set after the end date of the last measurement period. This is used when auto creating a new measurement period. This number must be greater than 0.
Next Period End Conditions (Months)
Input a number to indicate the number of months for the end date to be set after the start date when auto creating a new measurement period.
* Indicates these fields are always displayed on the form. They can not be removed through configuration.
- Complete any additional user defined fields.
- Click Save.